Pages

Wednesday, December 29, 2010

Silhouette cutter art

Just a quickie ... Kindergarten Crafter attempted two things this week. One from a common tutorial and another just made up outta the old noggin. SCARY!  Both use the silhouette vinyl cutter.

From Remodalholic, I snagged a tutorial for a PB knockoff  featuring giant numbers. As usual, it doesn't make sense for me to write a tutorial, just to show you how the Kindergarten Crafter version goes.

Even with the Silhouette, cutting out numbers larger than 8" wide was pretty time consuming. It took me an entire day to figure out the best / easiest way. Hint: Split the big ones in half and lop of the shortest ends of the tall numbers (7 for example) and just lump all the bottom ends on a single sheet. No sense using long sheets when you don't have to.


Use cool, decorative fonts. Don't ask why this is sideways, I think I took the picture that way.
You can see the ridge from the book pages under the coat of paint. I didn't have a phone book because we threw them all away (recycled. natch!) because we thought we'd never need them. Sheesh... famous last words.

Number 9. Number 9. Number 9.  (Beatles fan, anyone?)
And the end result? Close enough for the people I dance with.


OK, now for the scoring, so you know just what you're getting into.

EASE - On a scale of 1-5 thumbs, 1 being no problem and 5 making me cry, I give this craft:
2 Thumbs. Cutting and placing the vinyl might be a 4, but overall, pretty dang simple.

GIFTABILITY - On a scale of 1-5 gifts, 1 being barely giftable and 5 being almost sellable, I give this craft:
5 Gifts - TOTALLY giftable!

HAPPINESS - On a scale of 1-5 smilies, 1 being UGH and 5 being WOOT!!!, I give this craft:
4 smiles - All in all, pretty dang effective for a $20 canvas and some scrap paint.


The other project was a gift for YoungSon the linguist.

Originally, I did this:


~meh~
Nothing special. It just didn't move me. As I've gotten braver with the Silhouette though, I attempted a redo with some extensive weeding involved.

That's extensive. And the photo isn't faded, it's through the back side of the transfer tape.

Add some shiny paint:

CAREFULLY (seriously, this is hard!) peel off the vinyl and place it on the matching canvas and make another one, this time using black paint, and VOILA!!!!


A set of Arabic language wall canvases. Woot!!!


OK, now for the scoring, so you know just what you're getting into.

EASE - On a scale of 1-5 thumbs, 1 being no problem and 5 making me cry, I give this craft:
2 Thumbs

GIFTABILITY - On a scale of 1-5 gifts, 1 being barely giftable and 5 being almost sellable, I give this craft:
5 Gifts -  It's a gift. I have to give it a 5 or I can't send it.

HAPPINESS - On a scale of 1-5 smilies, 1 being UGH and 5 being WOOT!!!, I give this craft:
5 smiles - Sure, it's a little kindergarten-ish on some of the paint lines. But anybody who is that picky deserves to notice it. So HA!

Anyway, that's the abbreviated, last of the year, 2010 in review post. Look forward to learning and doing more in the year ahead.

HAPPY NEW YEAR!

Friday, December 24, 2010

Oreo Brownies

While I have holiday treats on the brain, I happened to see some amazing looking Brownie-covered Oreos over at the Picky Palate.

The tutorial is short and straightforward. Let's see how it worked out for the Kindergarten Crafter.

Gather your ingredients. I have flour here because I'm considered "high altitude" and have to add 2TB of flour to the brownie mix.


My mix doesn't look anything like hers. It could be the photography, but it's probably the extra flour.

I did make an extra effort to just barely coat the oreos. Many of the comments on her post talked about the brownies looking more like cakes than the brownies on her site.

When it was time for the unveiling, I've gotta say, I wasn't impressed. Oh, I was impressed by the CONCEPT, but these things stuck to the pan and were way crumbly. They looked nothing like the little adorable oreo bundles I'd seen.


But perhaps I'm being too harsh on myself. YOU be the judge of whether these are ugly as sin or whether they look pretty much like the original.

Picky Palate version:
Photo credit: Picky-palate.com
My version:


Yeah. That's what I thought as well. I'm not saying it can't be done. I'm just saying that I can't do it. Go give it a try and let me know if it works for you.


OK, now for the scoring, so you know just what you're getting into.

EASE - On a scale of 1-5 thumbs, 1 being no problem and 5 making me cry, I give this craft:
5 Thumbs

GIFTABILITY - On a scale of 1-5 gifts, 1 being barely giftable and 5 being almost sellable, I give this craft:
0 Gifts -  I actually threw these in the garbage, after we scrounged out some of the brownie parts.

HAPPINESS - On a scale of 1-5 smilies, 1 being UGH and 5 being WOOT!!!, I give this craft:
1 smiles - Happy that I tried it. And Happy that I had a  better project in the works right after.

Tuesday, December 21, 2010

Buying a new sewing machine?

I just did and let me tell you, it was tough. I kept seeing machines with a zillion stitches and all I wanted to do was sew forwards and be able to reverse at the end. Maybe zig-zag if I was getting all fancy. How in the world could I decide?


I ended up with a rockin' Brother SE400 but the other day saw a post at Learn2Quilt Online discussing lists of "must have features". I couldn't figure out how I'd know they were "must haves" if I had no idea what they did. Kindly, Chris Dahl answered my question with an entire post!! How's THAT for great service! While veering toward quilting, many of the features are things I currently love in regular sewing. And I almost hate to admit it, but I laughed at the needle up/down feature. Well, I laughed before I got it and use the heck out of it.


Go learn something. There is more to a sewing machine than forward, backward and zigzag. Who'd a thunk?


Learn 2 Quilt Online: Buying a new sewing machine: Must have features

Buying a sewing machine?

I just did and let me tell you, it was tough. I kept seeing machines with a zillion stitches and all I wanted to do was sew forwards and be able to reverse at the end. Maybe zig-zag if I was getting all fancy.  How in the world could I decide?

I ended up with a rockin' Brother SE400 but the other day saw a post at Learn2Quilt discussing lists of "must have features". I couldn't figure out how I'd know they were "must haves" if I had no idea what they did. Kindly, Chris Dahl answered my question with an entire post!! How's THAT for great service! While veering toward quilting, many of the features are things I currently love in regular sewing. And I almost hate to admit it, but I laughed at the needle up/down feature. Well, I laughed before I got it and use the heck out of it.

Go learn something. There is more to a sewing machine than forward, backward and zigzag. Who'd a thunk?

Monday, December 20, 2010

Baby Swaddler Thing

I have a darling granddaughter joining us in February! Yes, YoungSon & YSW (young son's wife) are blessing us with our first grandchild. I decided it was time to get sewing and picked what (seemed) to be a very easy swaddler-thing pattern and tutorial from Prudent Baby. This tutorial even said "new & improved" which led me to believe "easy". Not quite.

Let's see how this worked out for the Kindergarten Crafter:

The initial directions seemed clear enough, until I actually pulled out the scissors. I wasn't the first one with the issue, because in this new & improved version, she'd drawn a picture of what the cut would look like. That helped quite a bit. I'm geometrically challenged.

First, I cut the giant triangle.

Next, we are supposed to get two floppy pieces out of what's left. Again, her diagram helped, but it wasn't until I went to the original post (here) that I could get a better idea of what I was trying to do.

My first cut was a bit short, so I went in and made the skinniest pieces (which will eventually be the flappy ends we tie) a bit narrower.

OK... two of these. And I still think they look kinda wide, but babies don't know nuthin' about geometry, so I'm ahead of them at least.


I do not own a serger. I'd like one, but who in their right mind would buy me a serger when I can barely sew? Obviously, not the Husband. So I make do. You probably do as well. In the tutorial, she thoughtfully suggested bias tape. I hate bias tape. I think it was probably created to make my life a living hell and highlight my kindergarten attempts at sewing. It is much easier to hide wonky stitches on busy material than on nice, single colored bias tape. So no bias tape either. 

What I DO own is a sewing machine (shoutout to the Brother SE400. WOOT!) that has something called an OVERCAST stitch. This essentially means "Poor man's serge stitch" and I use it as exactly that. Like a zig-zag that goes over one edge, it does a fair to middlin' job at keeping the edges from fraying. I attempted to use it on the very edge of my flannel fabric, but let me tell you now: DON'T. Flannel is big on fraying. It took me quite awhile to dig the knots out of my machine. 

I sorta solved the problem as you see below. 


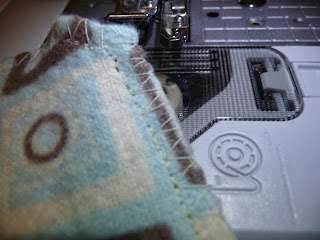
I turned back a smidgen of fabric - maybe an eighth of an inch? - and pressed it down. I then serged overcast stitched around the entire piece of fabric. The first curvy piece was a rude wakeup call that corners and overcast are not soul mates. This was extremely fiddly and slow sewing. For the second curvy piece, I got smart and resorted to my best sewing friend. You can just  barely see her below.


Yup, right there smack dab in the middle is a piece of double-stick iron on fusible tape. It was just enough to keep the corners down so I didn't get them all smooshed up sewing over them. And here's a hint: when you come to a corner using an overcast stitch, there's a little bar-like thingie on the foot that keeps your thread at the right tension. You cannot simply STOP, leave needle down, lift presser foot, turn like you can with a normal foot. I found you have to do that, then turn the wheel on your sewing machine for one stitch while the foot is up and then the fabric kind of comes out from under the bar-thingie. (Yes, that sounds confusing, but when you do it once you'll say AHA!)  OK... back to serging  overcasting.

From the front-side sewing-wise (which is actually the back-side of the project) this isn't so attractive. Although it gets the job done.


From the back (project front side) it's actually sort of cute. It makes the edges somewhat ruffle-y. 

I don't know if the ruffle-y thing is an intentional part of the stitch, but I can tell you that my fabric no longer would lay down flat after I used this stitch. Not necessarily a bad thing. Pretend like babies like ruffle-y.

We are now supposed to connect the two curvy pieces, which will eventually be sort of like bat-wings on the back of the blanket and wrap around the front. People with babies probably know this, but I was completely confused on the whole "how does a swaddling blanket work" thing. In the olden days, we just wrapped the kid in whatever we had and they were grateful by gosh!  (sorry... practicing my old-folk talk)

The tutorial calls for a french seam. While easy in theory, if you do not read the directions while you are doing it, but instead run back and forth between the computer room and the dining table, you might still mess up and  first sew your seams with the RIGHT SIDES FACING. That is WRONG. 

Yes, right is wrong for french seams. And quite honestly, I may be seeing a pattern here, but the french can keep their danged seams. I pulled out my mother's 40-ish year old seam ripper and thought I'd show you this family keepsake. 

Until I tried it and discovered that a SHARP seam ripper is the way to go. 40+ years of use is not a good thing when it comes to seam rippers.

 Go get a sharp one. You'll be glad. 
I read somewhere that you should use the short side down and the long side up, but I simply can't make it work that way. Do whatever it takes to get the mistaken threads outta the way. And  go slow - mistakes usually mean rips in the fabric. :(

I eventually figured out the seam, but honestly. I thought it was bulky and am not sure why I didn't just join them like I did for the  diaper cover.


 It might be a strength issue. Someone with more knowledge will have to give you advice on that. For now though, go with the french seam and decide for yourself. 

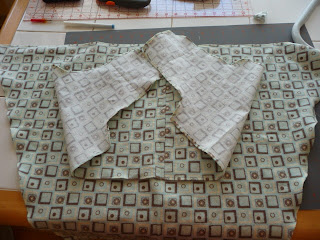
At this point, somebody with baby knowledge would have been able to easily figure out the actual "construction". I was confused. After several tries, placing the fabric on the front and on the  back and backwards (there is no upside down on the curvy pieces btw), I decided that below is the desired result.

Since the pattern is so busy, it might be hard to see, but the french-seamed batwing piece is laying on TOP of the long triangle. It's about 3" down from the top and centered left to right. As suggested in the tute, fold the skinny triangle and iron it to find center. I guessed on center on the batwing piece because I just figured the middle of the french seam.

In the new & improved (oh how I love typing THAT phrase) version, the batwing piece is not completely sewn down to the triangle piece. A gap is left so the swaddle-flaps can be stuffed through.*** I didn't measure the distance, just sort of winged it. (no pun intended). I also used something on my machine called a triple-stretch stitch. It's supposed to be strong. I don't actually like it, but you never really know that until you've already sewn it. Live and learn. Use something different on your machine.

Apparently, straight is not my forte. 


Although seriously, who would look that closely at a gift? 

I trimmed the loose ends but forgot to pull the thread and tie a knot. I actually am not really even sure how to do that or if this triple-stretch stitch even needs it, but with regular straight stitch you want to either reverse over your ends or tie the two ends together. Just in case, I decided to put some fraycheck on these spots.


Fraycheck does NOT want to help you. 
It wants to stay closed and make your fingers hurt while you try to stick a "fine needle" down the plastic tube.  


Yes, the pin BENT. That's how much fraycheck doesn't want to help. I did eventually get it open and put a couple of dots on the ends of any threads that looked weak. I went around the edges of the entire thing and put a dab or two here and there as well. Just in case. Even the Kindergarten Crafter doesn't want a gift to unravel.

Nevertheless, I completed a Baby Swaddler Blanket.  Which looks like a triangle with batwings on it. For those who don't know baby stuff, like me.

where does the baby go? and why did I leave a gap????

It looks SORTA like the original: 
Photo credit: Prudentbaby.com

And sorta like the new & improved version:
Photo credit: Prudentbaby.com

While not perfect, I totally think you could do this. And since the pieces of fabric are fairly big, if you muck it up you can still cut the pieces into something else. Like a diaper cover.


OK, now for the scoring, so you know just what you're getting into.

EASE - On a scale of 1-5 thumbs, 1 being no problem and 5 making me cry, I give this craft:
4 Thumbs

GIFTABILITY - On a scale of 1-5 gifts, 1 being barely giftable and 5 being almost sellable, I give this craft:
4 Gifts

HAPPINESS - On a scale of 1-5 smilies, 1 being UGH and 5 being WOOT!!!, I give this craft:
3 smiles

Skills learned: french seams, fusible tape, overcast stitch, fray check, seam ripper, triple stitch

***What is that gap really for? It makes no sense. I don't have a  baby to test it on, but I cannot for the life of me decide what the gap is for. If you know, please let me know. Thanks


Friday, December 17, 2010

Cutesy Kimono and Diaper Cover

This week's project came from two different sites. Original tutorials can be found at Cook, Clean, Craft and Made.

Go check out their version, then come back and I'll tell you how it worked for the kindergarten crafter.

 Cutting out the pattern was not terrible. Not EASY, but not terrible. Taping it together - another story. Lots of pieces as you can see:
And let's just say that even though I printed them exactly like I was supposed to, they didn't quite line up. No matter...


After pinning the pattern and cutting out my fabric, I started sewing. A couple of things to note:
The directions were easy enough to follow - I'd say a 7 out of 10 as far as clarity. I had to zoom in on a couple of pictures to truly get the gist of it. 

Up until the part where  I had to use bias tape, I was thinking I was pretty amazing. Oh sure, the seams aren't perfect and there seems to be a lot of thread just laying around every which way, but in general, I was feeling like I had accomplished what I set out to do.


Bias tape ruined that for me. I used the great directions from Sew to Speak yet somehow, it didn't quite work.


Nevertheless, I wasn't going to rip it out and try it again. At this point, the Kimono almost finished. From a distance, it's looking pretty stylin'!!!


Up close, not quite so stylin'. But think about it: babies don't know if it's it's straight. Babies don't know much 'cept burpin and boobies, so I'm still feeling pretty confident here.


As a first, I used my sewing machine's button-hole feature. I've never made a button-hole before and honestly, would have said someone was crazy if they said "no problem". Surprisingly, no problem. I followed the directions on my super cool, brand new Brother SE400 and low and behold, a buttonhole!!!! There was only one minor issue and unfortunately, it was un-fixable. I started the buttonhole at the wrong end and that stuff just isn't seam-rippable on flannel. I'm pretending like it's a design element.


I also used the "sew on a button" feature of the machine. Yes, the machine sews the buttons on for me. What's not to love!!!!! Other than the Husband finding out I can sew buttons, but I don't expect him to visit the blog, so I should be safe.

It would have been nice had I known buttons are apparently not allowed on baby clothes. Choking hazard and all that (thanks Dori! you were about 30 minutes late with that advice though!). Back in the olden days, babies couldn't tear buttons off - not sure how they became so capable. I'm thinking this may not get really any "baby time" so I'm not worried. Plus, I'll send some velcro and the DIL can tear the buttons off before my darling granddaughter gets to them. :)

On to the  diaper cover!!! 

I did not have enough fabric left over all in once piece, so I had to piece together the baby booty part. I pretended like the crazy-quilt feature on my sewing machine was meant to join items together decoratively. Basically, I sewed it up the two pieces on the inside with a regular seam, then ironed the seam flat and sewed over it from the right side so I could pretend like it was intended that way. 


For the inside seams, I do not have a serger. Sadly. But I do have something called an overcast stitch. I doesn't always look as ugly as this. Sometimes it looks worse, but I've had a time or two when it totally rocked and looked almost like serging. And it's cheaper than a serger because it's included. Babies don't even look at seams, btw. I know this for a fact. That's good, because these seams = not so attractive.


Getting the elastic in the legs was fairly difficult. One, I sewed one of the seams a little bit close and the elastic had to be folded to squ-e-e-e-eze in there. Two, I couldn't find a safety pin, so I tried poking a hole and bending a bobby pin into sort of a reverse-curvy thing. I suggest you find a safety pin before running elastic.

So... the end result:


Ya know what? I looks just like a baby outfit. Go figure!

And compared to the originals: 
Photo credit: Cook, Clean, Craft cookcleancraft.com

Photo credit: MADE - dana-made-it.com

Not the same, but they're professionals! I suggest you visit them and get the real instructions and get busy sewing!

Now, for the scoring. Kindergarten Crafter will be giving these crafts a score, so you know just what you're getting into.

EASE - On a scale of 1-5 thumbs, 1 being no problem and 5 making me cry, I give this craft:
3 Thumbs

GIFTABILITY - On a scale of 1-5 gifts, 1 being barely giftable and 5 being almost sellable, I give this craft:
3 Gifts

HAPPINESS - On a scale of 1-5 smilies, 1 being UGH and 5 being WOOT!!!, I give this craft:
4 smiles

Skills learned: taping, bias tape, elastic, buttons, buttonholes,

Thursday, December 16, 2010

Oreo Cookie Lollipops

If you see the original at How Does She? you'll be convinced it's easy peasy. After all, there's LITTLE KID helping. How hard can it be? And look how clean her kitchen looks!!!

Here's the Kindergarten Crafter's version.

Gathered the ingredients from Joann's and the local grocery store. Not so hard. Melted the ingredients. Well, half the melty stuff because I thought I didn't need the entire container of melty stuff, so why waste it. Apparently, having the proper amount of ingredients is what makes it easier to dip. Oh. Well now you tell me.


 Tear apart the oreos wasn't too hard. A simple twist and voila. I read some people who struggled with this, but I think I've found my niche: oreo deconstruction.

Adding the sticks was pretty simple as long as you remember to scoop out the filling in the area where the stick will be. You must eat the filling. It's like a rule. A fattening rule, but a rule.


Dip the stick into the melty stuff and stick it in the open space in the oreos. Put a lid on it.


It's important to scoop out the filling first. Trust me. I ended up with more cracked tops by thinking I knew better. Just scoop and eat, then fill.

The rest is as self-explanatory as can be. And yes, that means I got my hands so covered in melty stuff that I didn't dare touch the camera until I was finished.

The end result:


My version:


Original version: 
Photo credit: howdoesshe.com

Ya know what.... they look pretty much like Oreo lollipops. Sure, there was some minor mess to clean up, but hey... I'd made homemade treats that would be garnering me tons of style points. What's a messy kitchen versus style points?

But I'll bet you their messy kitchen didn't look anything like mine. 
(There was a secondary project going on at the same time - peppermint body scrub. Review to follow soon)


OK, score time:
EASE - On a scale of 1-5 thumbs, 1 being no problem and 5 making me cry, I give this craft:
2 Thumbs 

GIFTABILITY - On a scale of 1-5 gifts, 1 being barely giftable and 5 being almost sellable, I give this craft:
5 Gifts - people were digging on these things at the Husband's work. TOTALLY worth the mess!!!!

HAPPINESS - On a scale of 1-5 smilies, 1 being UGH and 5 being WOOT!!!, I give this craft:
4 smiles - anything that offers style points is a craft worth doing.

Skills learned:  melting choco-melty-stuff, dipping oreos, crushing peppermint, cleaning kitchen